
The PLG Engine: A definitive guide to scaling B2B SaaS using product-led growth [PART 2]
Bowling Alley Framework, TTV, Flywheels and PQLs.

👋 Hi there, I’m Justin. Welcome to another edition of SaaS Decoded. Each week, I publish an in-depth, actionable guide to help SaaS founders and operators grow their businesses.
Hey friends,
Last week I published part 1 of my series on product-led growth for B2B SaaS.
In part 1 I introduced the concept of PLG and shared 8 examples of companies which grew to “unicorn” status using PLG tactics.
In part 2 I’m going to go deeper on the core concepts behind a PLG strategy.
I’ve also decided to cover the topic of PLG metrics in next week’s post which will be part 3 of this series.
The PLG concepts I’m covering in this post include:
The Bowling Alley Framework
Time-to-value (TTV)
The Flywheel Effect
Product-Qualified Leads (PQLs)
The Bowling Alley Framework
The Bowling Alley Framework is a powerful user onboarding strategy developed by Wes Bush, the founder and CEO of ProductLed.

A business which adopts a PLG strategy needs users to drive user acquisition.
Therefore, it’s critical that users experience the desired outcome of the product so they can tell their friends, coworkers and extended network.
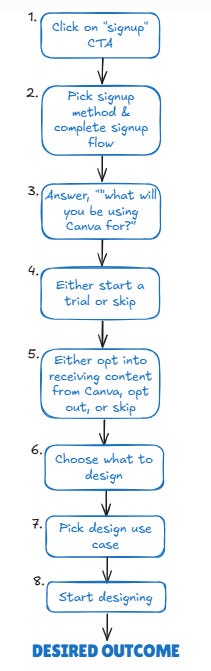
As the image above shows beautifully, the Bowling Alley Framework is designed to help guide users to their desired outcome.
To implement the Bowling Alley Framework, a business needs to do 3 things:
Define the straight line to the desired outcome
Create one or more product bumpers
Create one or more conversational bumpers
Define the straight line to the desired outcome
Each SaaS product needs to have a clearly defined straight line to their desired outcome.
This would be the path that you’d expect the majority of users to take to experience the core value the app provides.
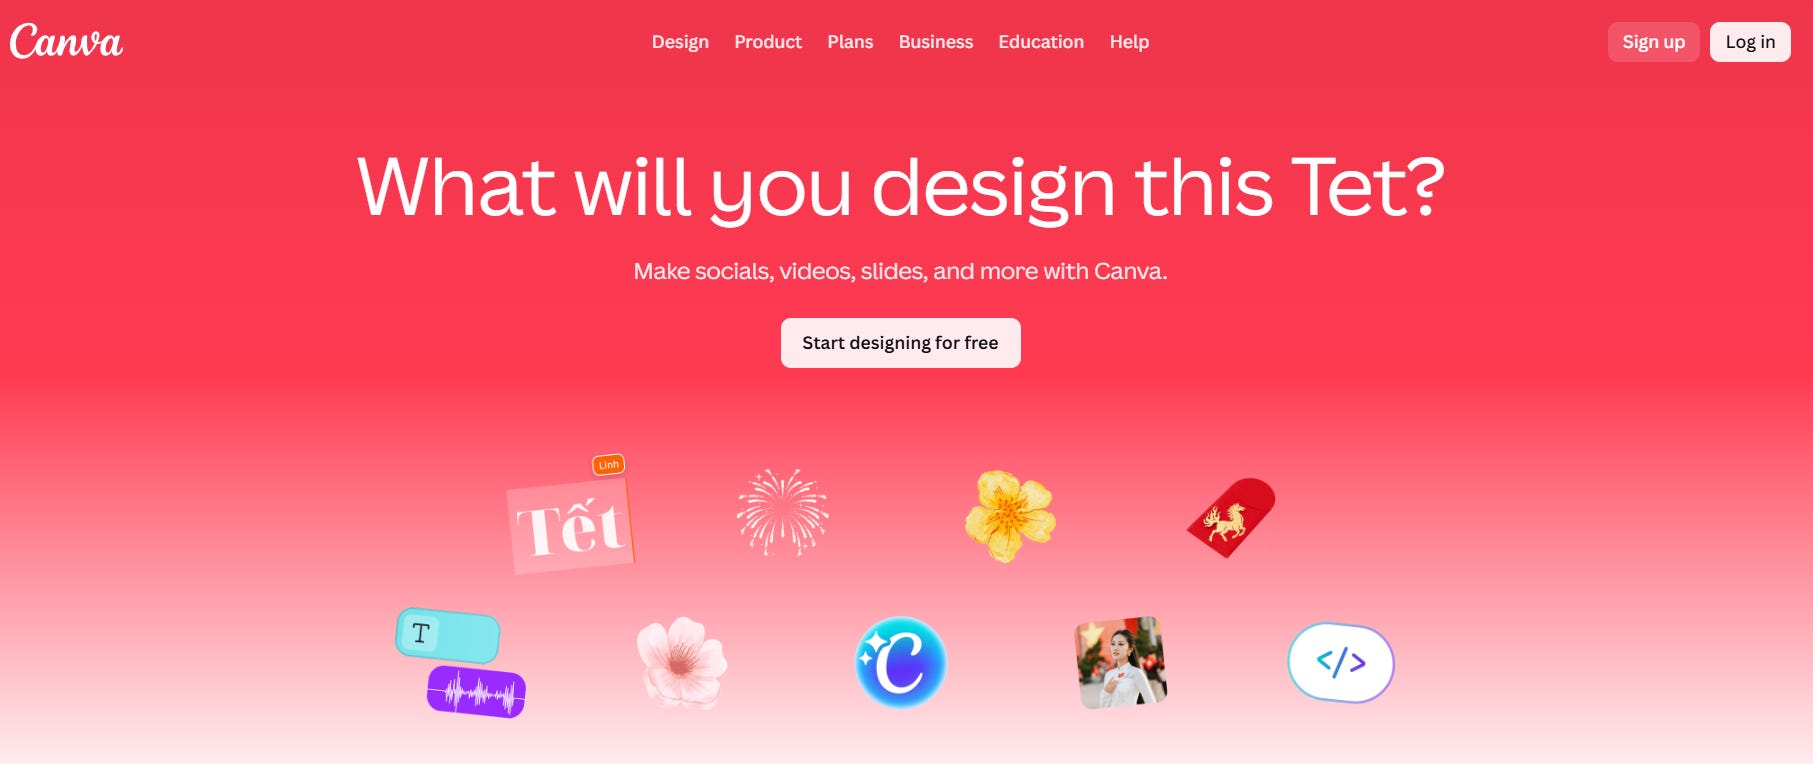
Let’s look at Canva’s “straight line” and see what we can learn.
Step #1 - Visiting Canva’s homepage and clicking on “Sign up” or “Start designing for free”.
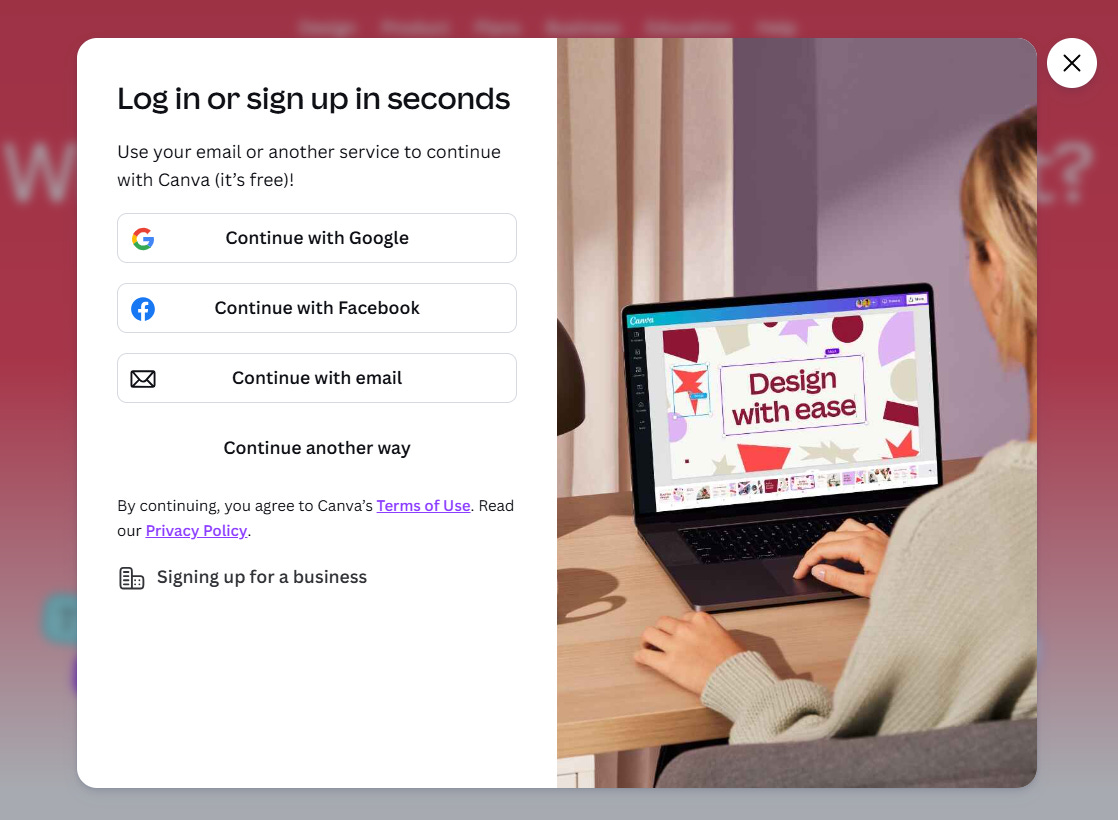
Step #2 - Choosing your desired signup method and complete the signup process.
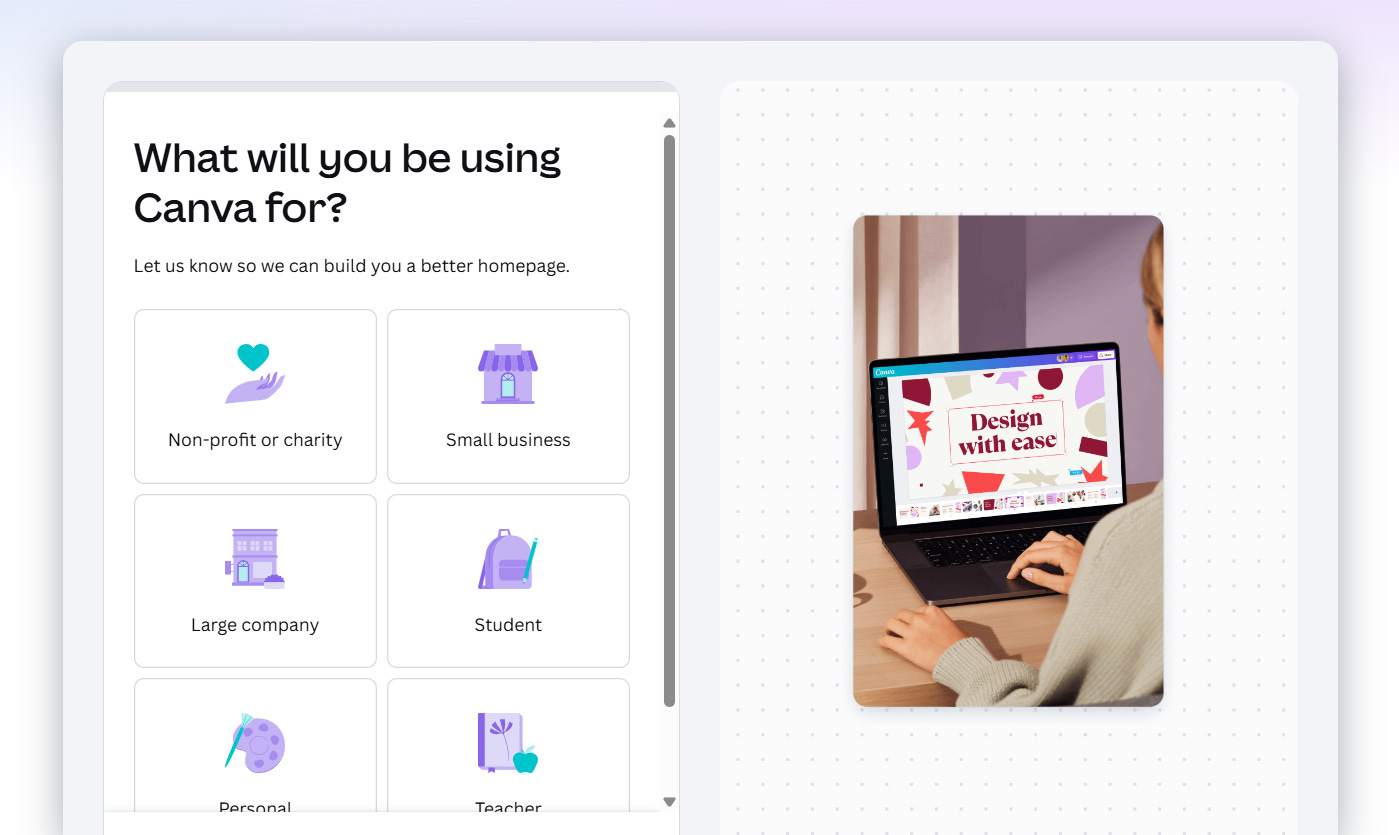
Step #3 - Answering the question, “what will you be using Canva for?”.
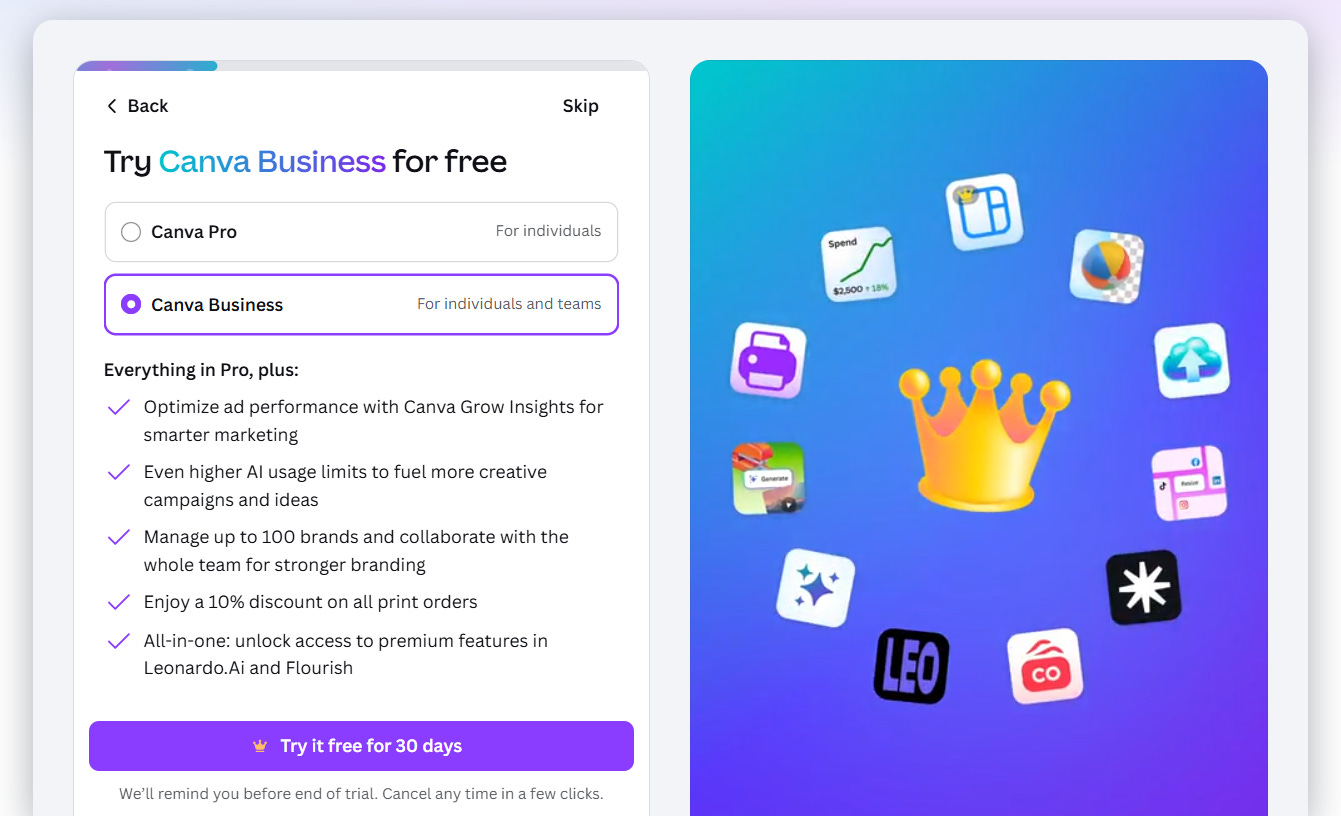
Step #4 - Either start a trial of Canva Pro / Canva Business, or skip.
Since I chose “Small business”, Canva gave me the option to immediately start a trial of their premium offering.
This is smart because a certain percentage of businesses will convert immediately to the paid version which benefits Canva, while adding very little friction to the onboarding flow.
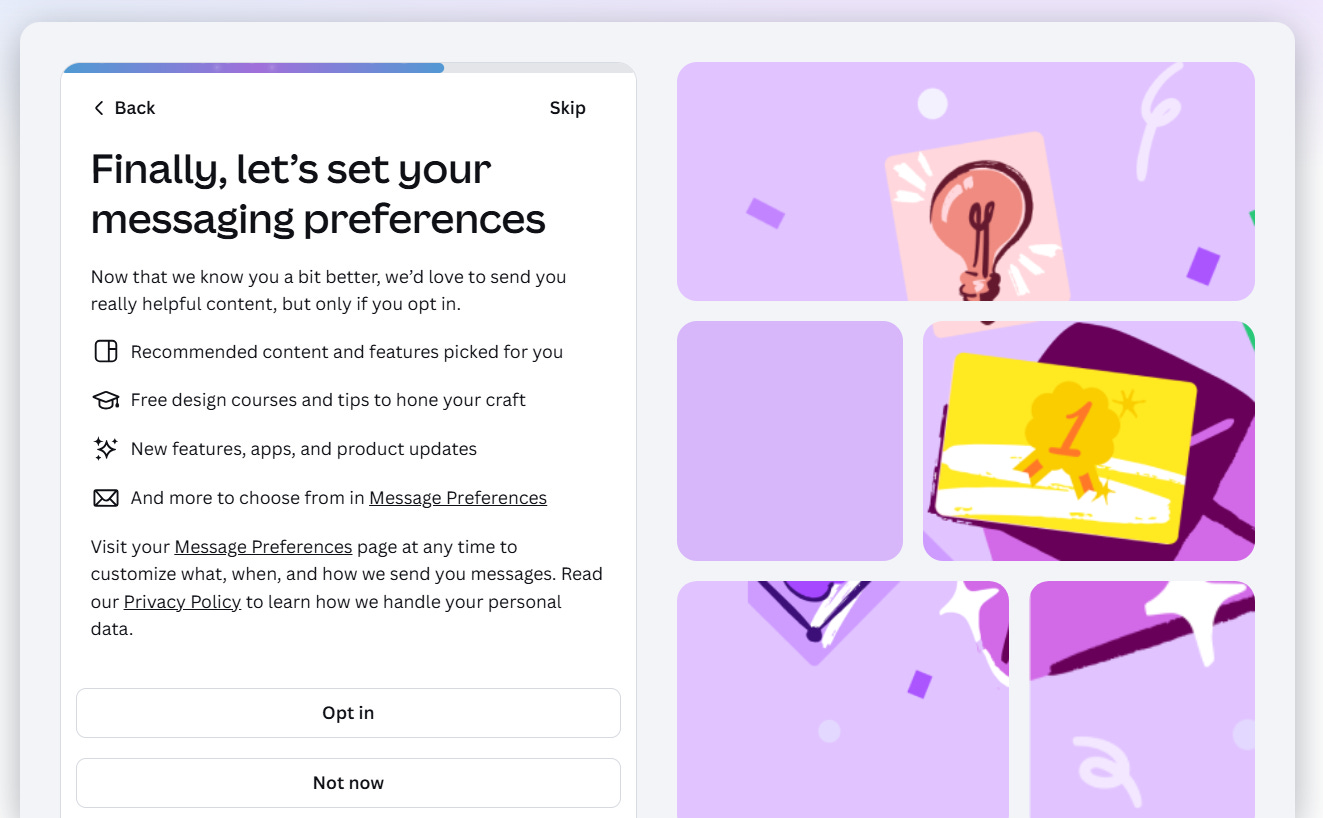
Step #5 - Either opt into receiving content from Canva, opt out, or skip.
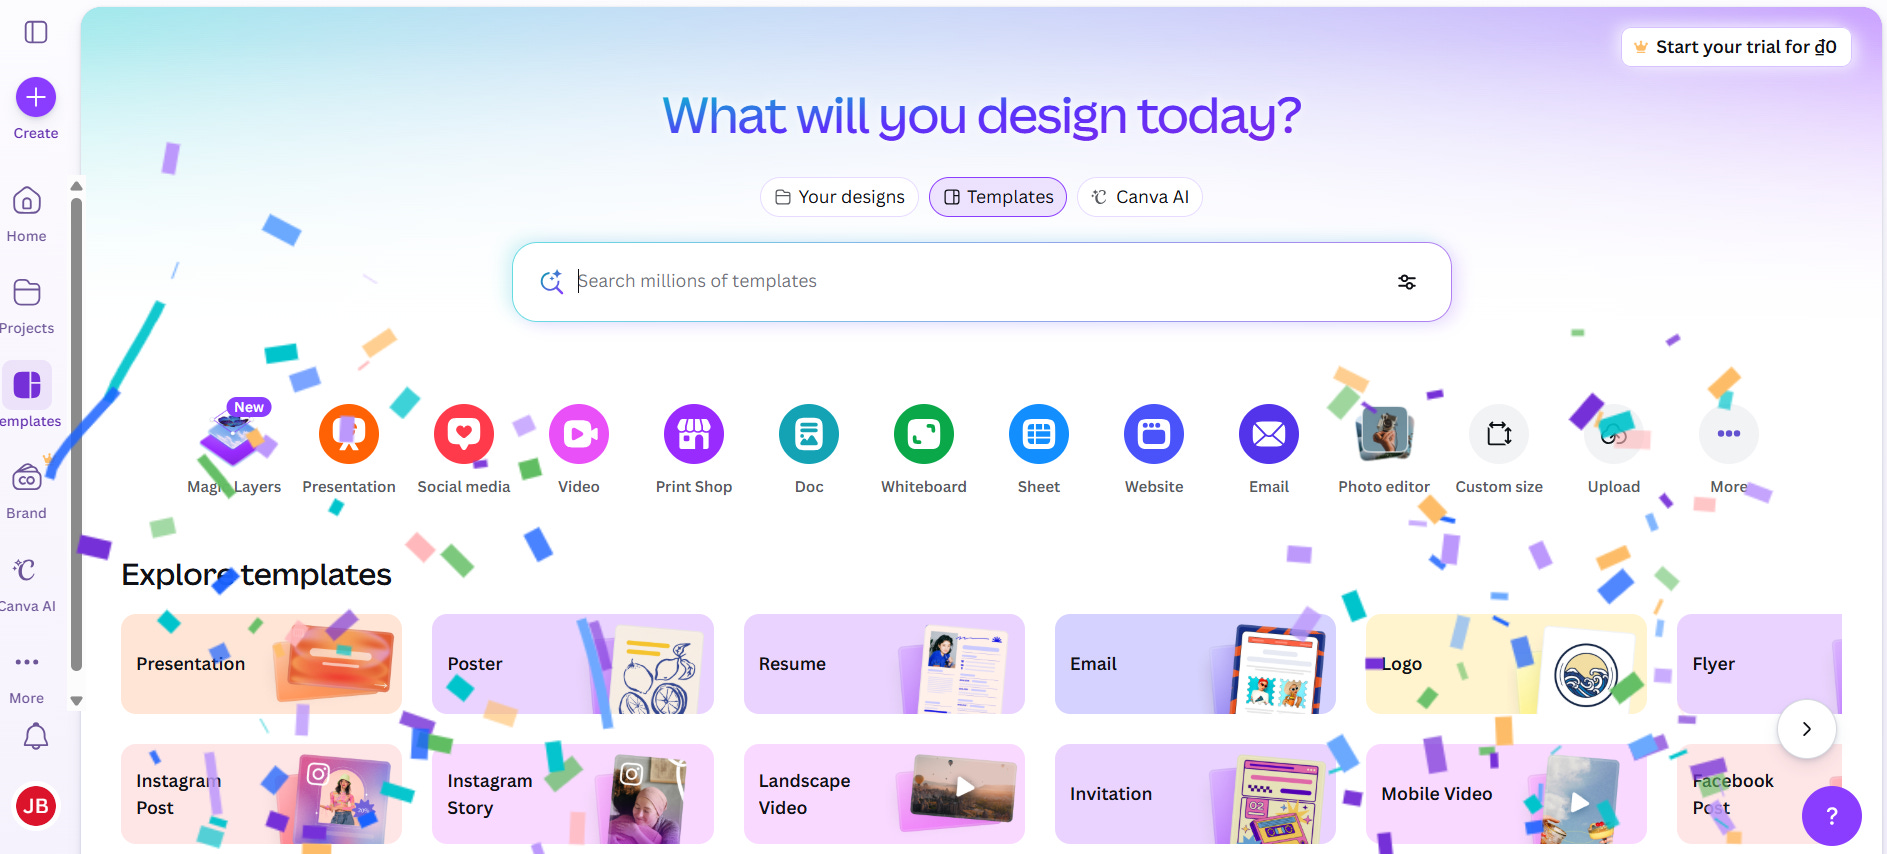
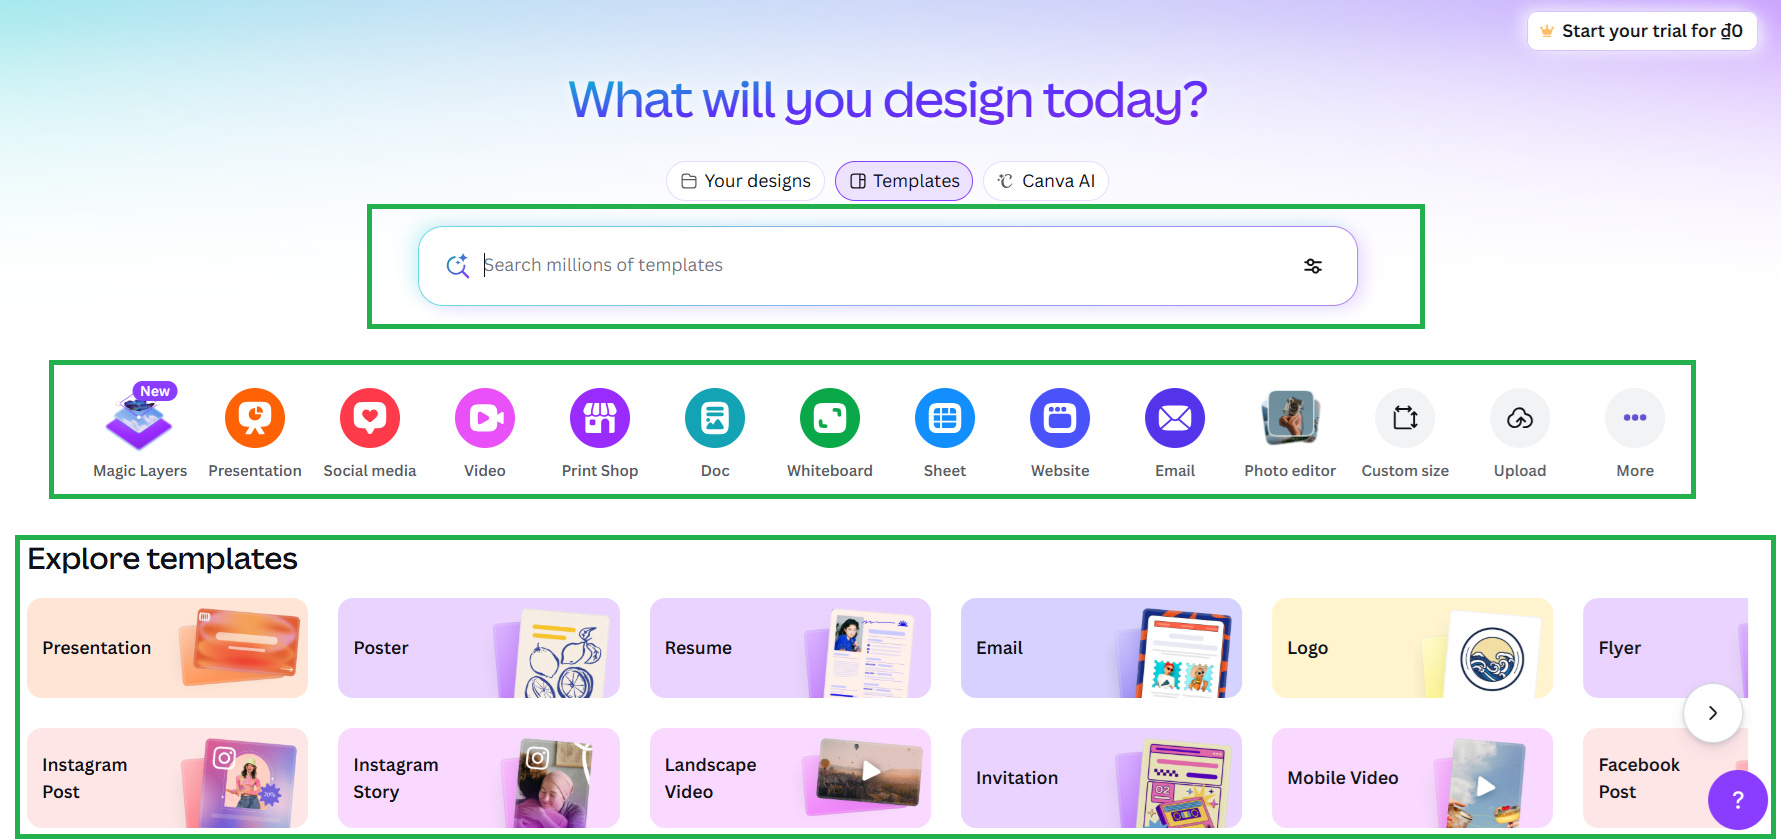
Step #6 - Choose what to design.
I was now done with the onboarding (notice the confetti to congratulate me) and ready to get designing.
Canva does an amazing job of showing the wide range of design options and emphasizing “templates”.
Templates are key for helping non-designers (Canva’s target market) create designs without having to create designs from scratch.
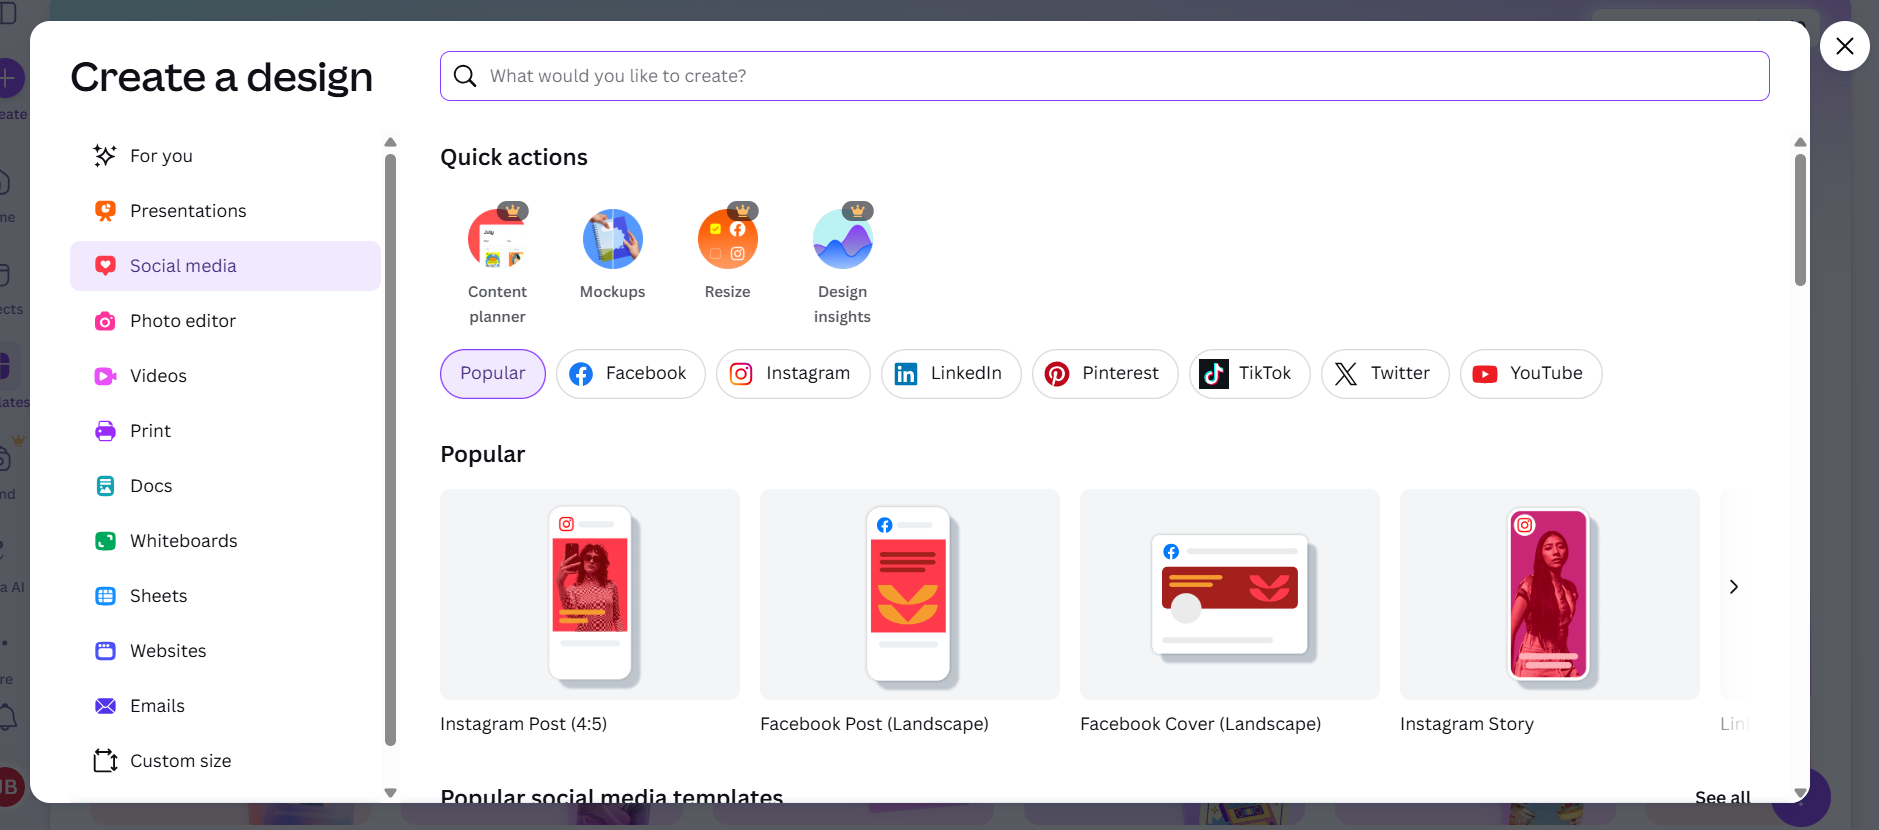
Step #7 - Pick design use case.
For this example I want to create an image I can use in a LinkedIn post to promote this Substack post.
I clicked on “Social media” and then “LinkedIn”.

Step #8 - Write out my desired outcome, pick a free template and make changes.
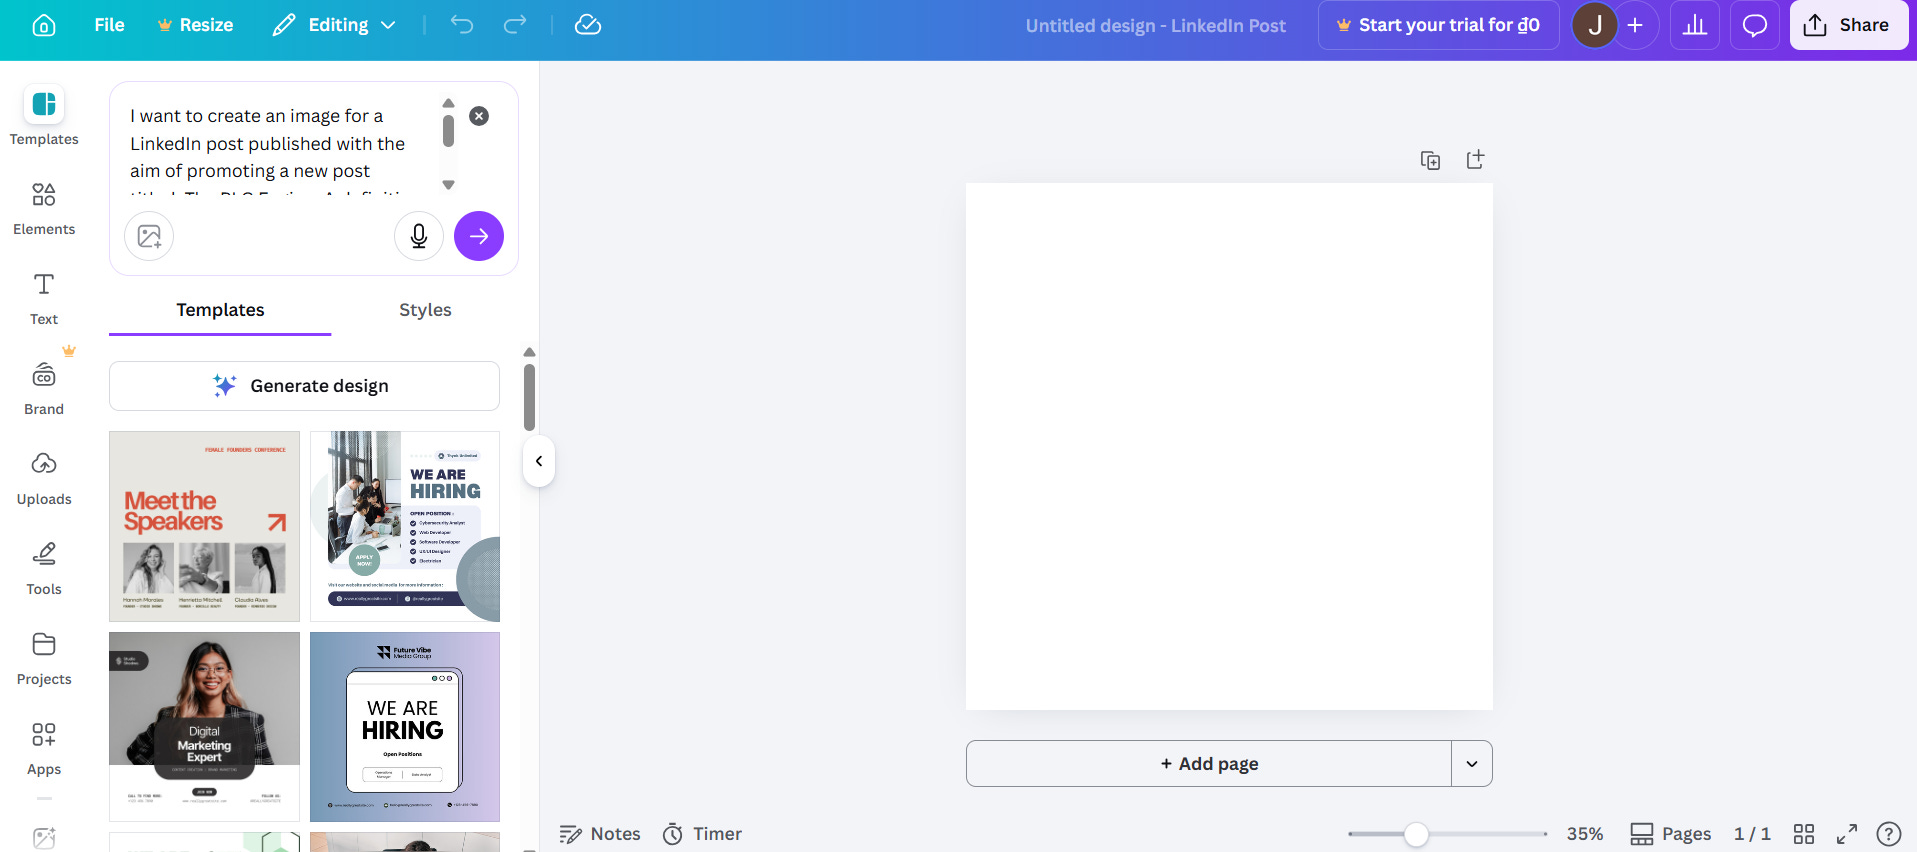
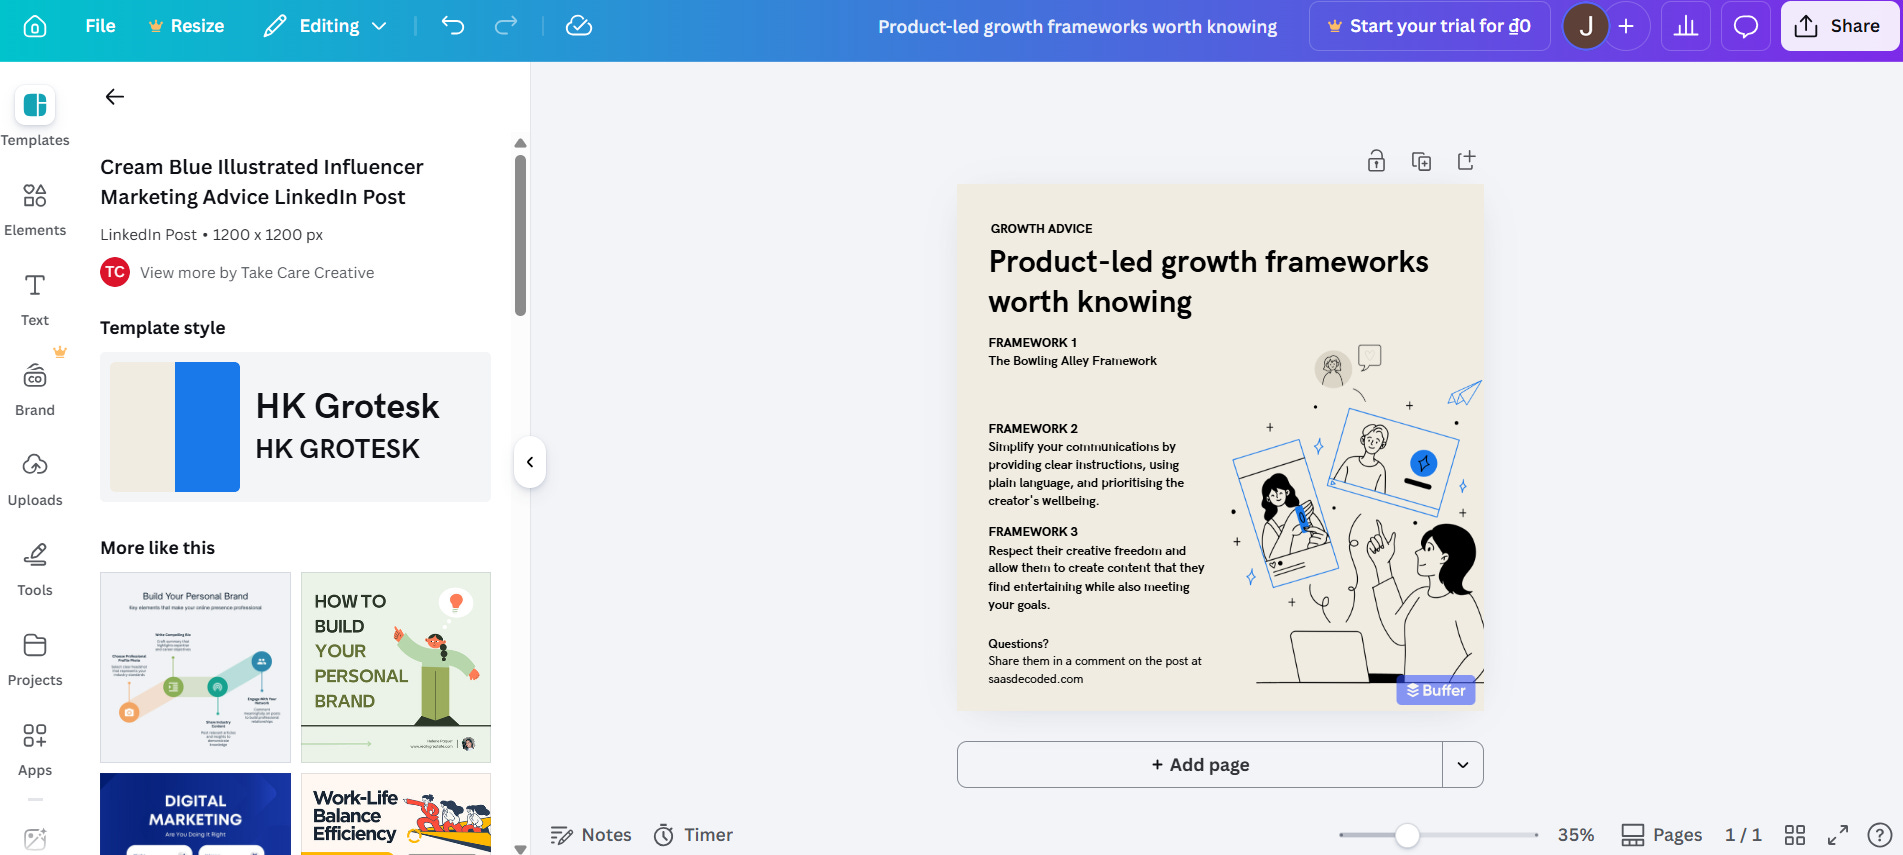
In 8 short steps I went from a non-user to my desired outcome, designing an image for a LinkedIn post.
The time-to-value, a topic I’ll be covering later in this post, was less than 5 minutes.
Create one or more product bumpers
Product bumpers are user-interface-based elements and messaging set up in the product to help users get to their desired outcome.
Product bumpers can take many forms from product tours, to progress bars, checklists and welcome messages.
In the case of Canva, their use of the search bar, icons and cards are product bumpers since they help guide the user to the design builder where value is created.
A nother great example of a business that uses product bumpers effectively is Canny.
After signing up to Canny you are taken to a “Get Started” page (screenshow below).
On this page Canny has 3 distinct sections.
On the left you have listed the main product that is chosen during the onboarding, in my case it was the Feedback Portal. Canny indicates to me that there are 4 steps to finish setting up this feature. Those 4 steps are shown directly to the right of the left hand section.
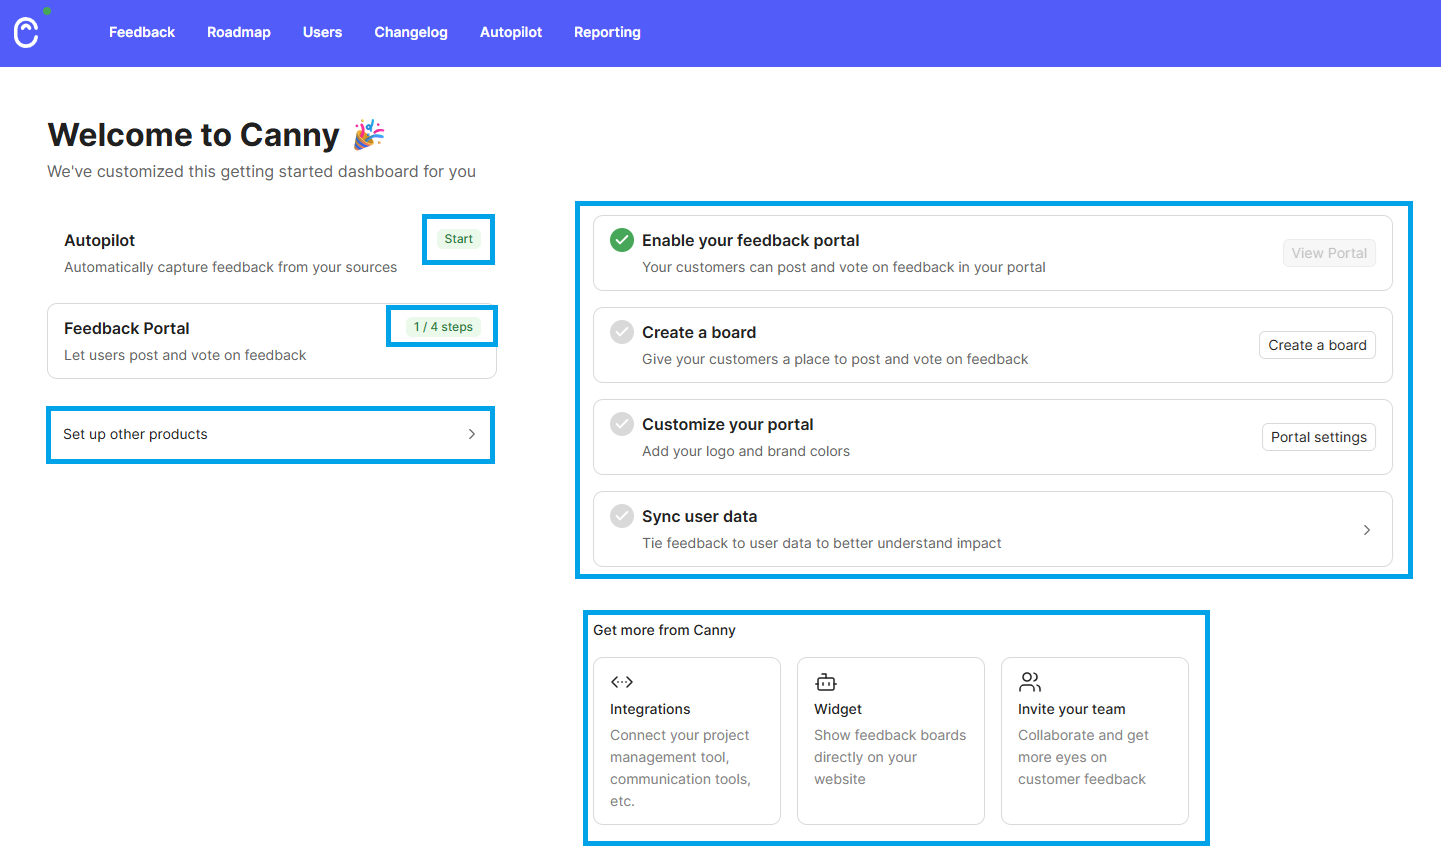
Canny emphasizes that there are other products I should explore and three ways I can get more value from their platform (by setting up integrations, deploying their widget, and by inviting my team to my Canny account).
Canny has effectively communicated multiple things to me with clear emphasis on the additional steps they suggest I take to complete the onboarding.
Create one or more conversational bumpers
Conversational bumpers are messages that are set up outside of the product with the purpose of educating, re-engaging and helping guide users to their desired outcome.
The most common example of a conversational bumper is the onboarding email series which most SaaS have in place. These are the emails you receive for the first few weeks after signing up to a SaaS.
Below is the welcome email I received after signing up to Canny.
I’ve highlighted in green the elements of the email I want you to pay attention to.
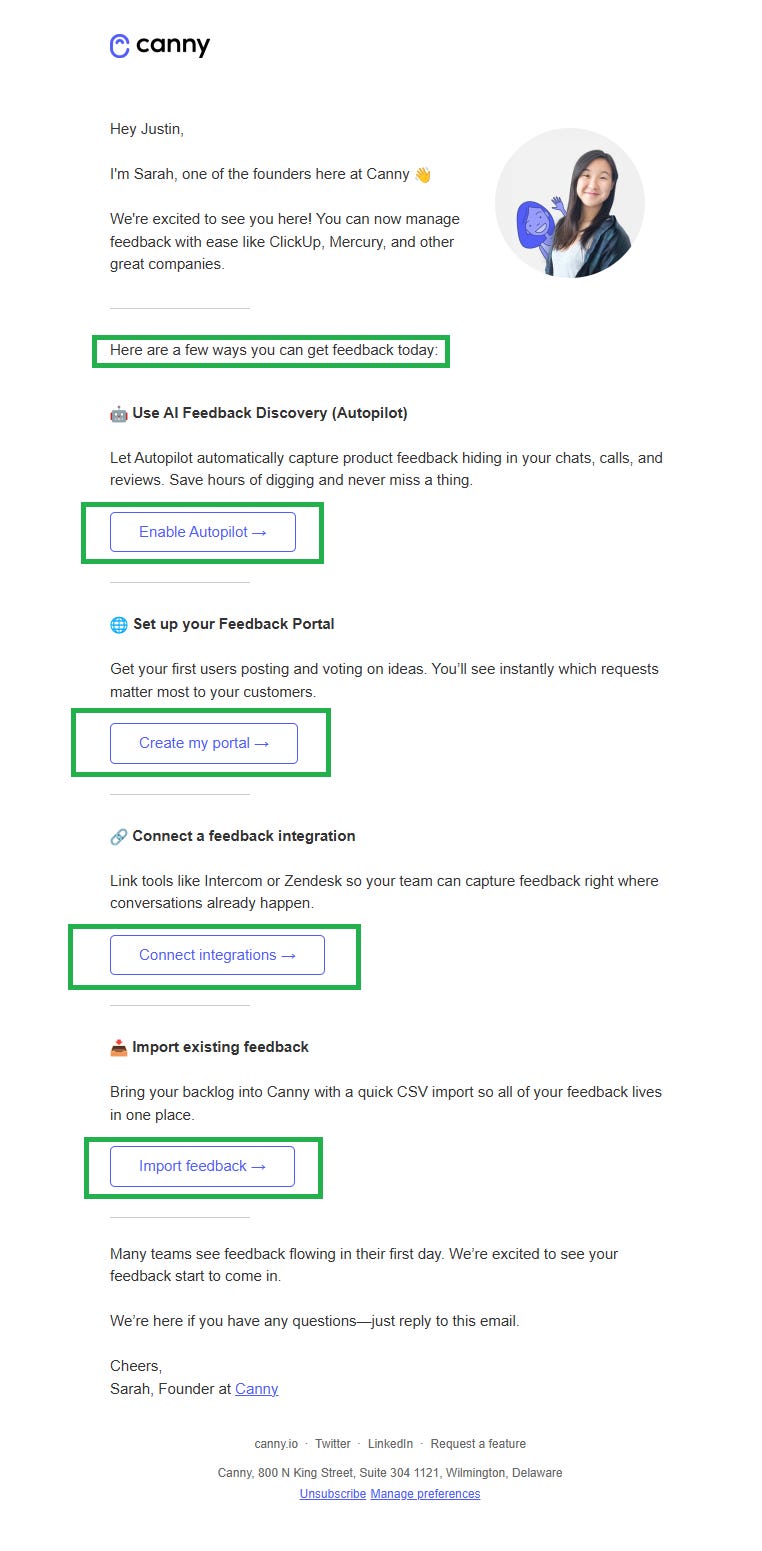
Notice the clear intention of the email, to help you start generating feedback. Canny’s whole focus is on helping its users generate and manage product feedback.
Once a single piece of feedback exists in Canny the user experiences the “Aha Moment” which is why Canny aggressively pushes the user to reach this point.
Canny’s welcome email has multiple calls-to-action which is typically not best practice, but notice how well the different options are laid out. Since the email has one main goal, providing multiple options to the user, each with its own CTA isn’t a big deal.
Other mediums such as SMS, explainer videos, and push notifications are also used for conversational bumpers.
A tool like Intercom is very effective for creating smart welcome series. Intercom allows you to leverage your user and product usage data to build communication flows with smart branching.

Time-to-value (TTV)
Time-to-value or TTV for short, is the amount of time it takes for a user to realize the value they were promised.
In PLG, we specifically focus on the "Aha! Moment"; the point where the user’s mental model of your product shifts from "Is this what I think it is?" to "I get it."
If the Bowling Alley Framework is designed to help get users to their desired outcome, then TTV is the time it takes the user to reach that point.
As a general rule TTV needs to be as short as possible without deminishing the value the user receives when he reaches the “Aha! Moment”.
The main reason TTV needs to be short is users need to quickly see the value the service provides or they will churn (leave and usually never return).
Key variations of TTV
TTV can be measured in a few different ways.
Time to Desktop/Login: The literal time to access the app.
Time to “Aha!”: The moment of emotional/mental realization of value.
Time to ROI: When the customer sees a measurable return (e.g., their first sale, first automated report, first lead captured, etc).
Time to Expansion: When the user realizes enough value to upgrade or add seats.
The most important is “time to ‘Aha!’” since once the user “gets it”, users will be more likely to give the app a chance and continue using it. This gives the SaaS more time to show ROI and set up the conditions for account expansion.
Strategies to Reduce TTV
To win at PLG, you want to drive TTV as close to zero as possible. Here is how the best SaaS companies do it:
1. Progressive Onboarding
Don’t demand a 10-step setup immediately. Use functional deconstruction: give the user a small win within 30 seconds, then ask for more actions later.
We see this in action in Canny’s onboarding.
After a short signup and onboarding flow, you get to see your feedback board (the small win), but Canny does require the user to take a few more steps to complete the setup.
2. “Empty State” Optimization
Nothing kills TTV like a blank dashboard.
Templates: Provide pre-filled boards or docs (e.g., Notion, Canva).
Dummy Data: Show them what a “success state” looks like.
After completing the onboard, Canva gives you dozens of options for easily getting started. Imagine how much tougher it would be for users if they didn’t have these options listed out for them?
3. The “Frictionless” Path
The more friction there is to getting to the “Aha! Moment”, the worst off users will be. PLG businesses are obsessed with removing friction wherever possible.
Login using Google/Facebook: Google/Facebook login removes the “check your email for a link” or remembering password friction.
No Credit Card Required: Removing the paywall at the start allows the user to reach the “Aha!” moment without a financial barrier.
4. In-App Guidance
Use interactive walkthroughs (like Pendo, WalkMe or Intercom) that guide users toward the specific feature that triggers the “Aha!” moment.

Measuring the TTV Funnel
To improve TTV, you have to track it.
The easiest way to do that would be in a spreadsheet where you can record your targets and cohort-based analyses.
It’s important to use cohort-based analyses to track the TTV metrics since it’s reasonable to assume your product and marketing are evolving and not every user is the same, or has the same experience.
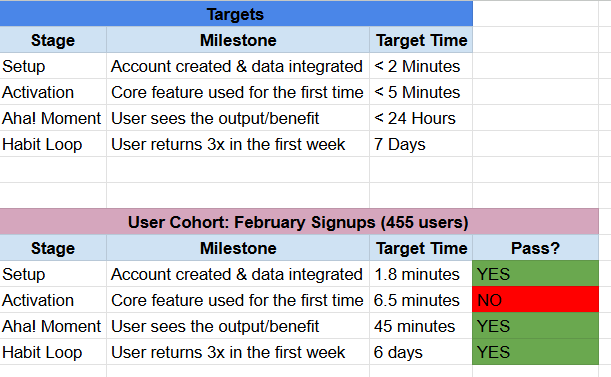
Remember that you need a sufficient number of users and event tracking in place in order to conduct the kind of analyses needed to build the table above.
*The results in the below table would be either the average across the entire cohort, or the bottom 80% percentile of users (rank users by quickest to “Aha Moment” and measure users up to the 80% percentile).
The Flywheel Effect
When it comes to exponential, viral growth (what PLG businesses hope to achieve) flywheels are everything.
First let’s try and understand a flywheel.
Below is an example of a PLG flywheel that Notion has built.
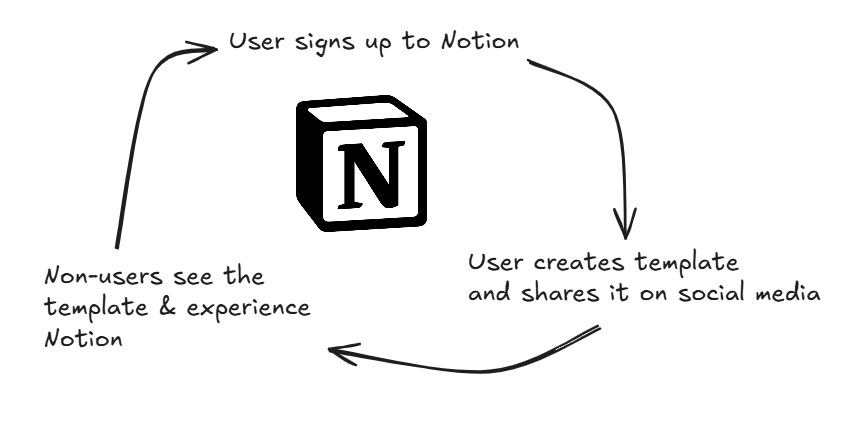
The first step in the flywheel is for a user to sign up to Notion. To get this flywheel started, Notion had to run marketing campaigns and drive traffic to their website.
Most flywheels require an initial “push” by the business to get it started but after enough “energy” is put into the “system”, the flywheel continues on its own.
The second step in the flywheel is for a user to create a template in Notion and share it publicly on social media.
The result is that some non-users see the template, get their first taste of Notion and then decide to signup and try out Notion for themselves.
Note how step 1 was started by Notion but the rest of the steps are performed by actors other than Notion.
By making part of their product modular and sharable, Notion was able to construct a very successful PLG flywheel. But it doesn’t end there.
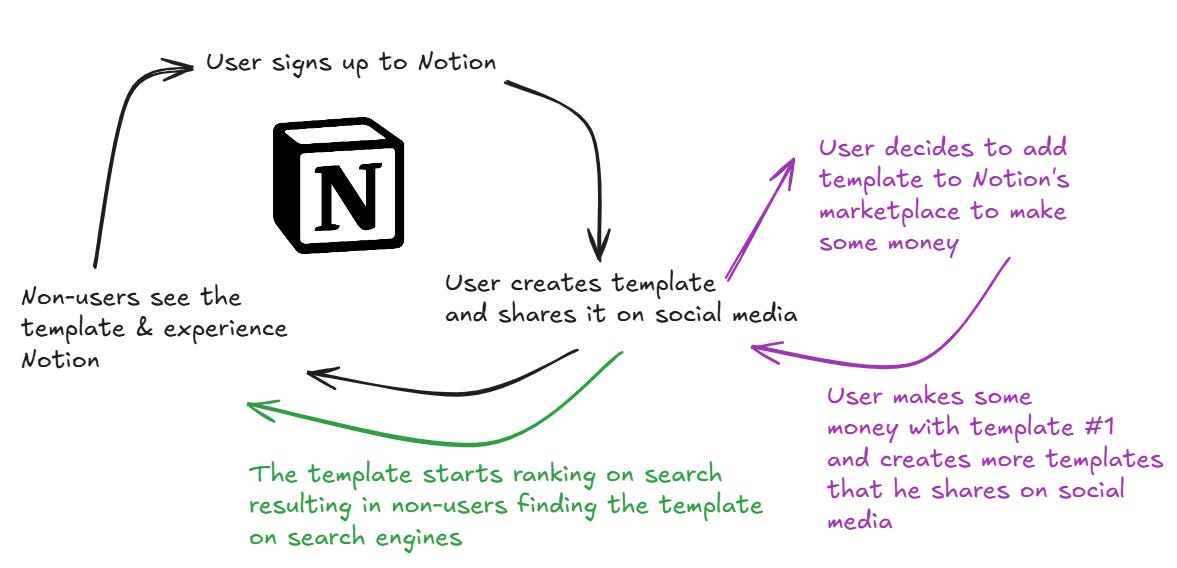
By allowing search engines to crawl the templates, and by launching their own template marketplace, Notion was able to leverage more traffic engines (SEO and marketplace) to “speed up” and enhance the flywheel.
The most successful PLG businesses leverage multiple flywheels and have taken steps to enhance them.
Let’s take a look at another example.
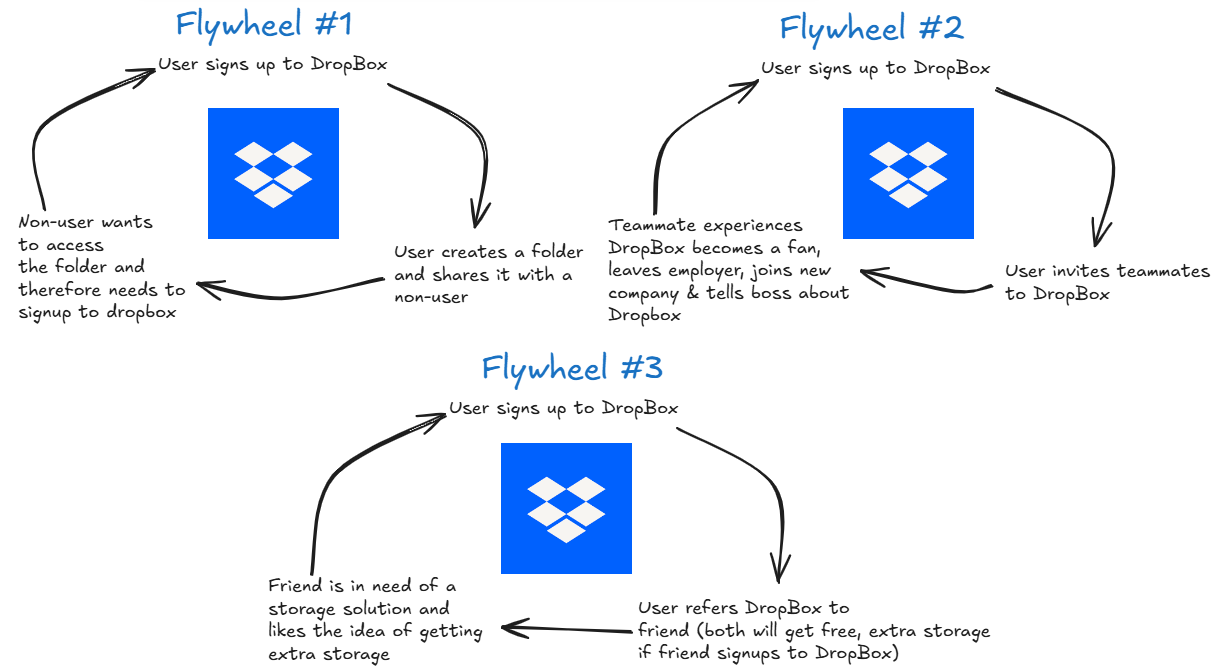
DropBox is one of the legends of PLG. I covered them in detail in part 1 of this series.
As the image above shows, DropBox leverages multiple PLG flywheels.
The first is a classic “collaborative” loop where users of DropBox can use the product to share files with others, driving non-users to DropBox without DropBox needing to do anything.
The second flywheel is another “collaborative” loop where one DropBox user exposes the service to their colleagues, driving brand awareness and creating DropBox advocates who will introduce the tool to future employers.
The third flywheel is DropBox’s most powerful.
It leverages a two-sided incentive referral program to empower users to drive new signups.
What makes this referral program special is that both parties have a powerful incentive while the cost to DropBox is extremely minimal (the cost of storage is very low).

Product-Qualified Leads (PQLs)
Most PLG businesses drive the majority of their revenue through a freemium, self-service model.
The idea is to allow users to experience the product for free and once they are ready they can upgrade to a paid subscription to experience more value (or continue to receive value).
Once a freemium SaaS has enough paying users certain patterns emerge which can be used to predict the likelihood of a user becoming a paying user.
A product-qualified lead is a user, or account in the case of B2B, which has taken the necessary actions, or received enough value that they have a high chance of upgrading to a paid subscription.
Reaching the “magic number”
There is a fascinating story from the early days of Slack which PLG businesses should know about.
The founders of Slack noticed by looking through their data that 93% of businesses that wrote 2,000 messages ended up becoming paying users.
Since Slack had it’s “magic number” it could define users as being “product-qualified” once they hit that number.
Once a PLG business identifies it’s “magic number”, the entire focus of user activation should switch to removing friction and enabling users to reach that number.
The “magic number” doesn’t always exist in a vacuum.
Often the qualifications for a user to become “product-qualified” include a combination of product usage, depth of usage (number of features, number of integrations setup, etc), time of use (used the product for more than X months), and characteristics of the business itself.
Everything from the number of employees, age of the company, the culture of the employees, geography, and industry play a part.
Once a user, or account, gets “flagged” as a product-qualified lead, it’s common for SaaS business to start sending emails and other forms of communication (popups for example) to introduce the user to the benefits of the paid plans.
This little “push” helps improve conversion to paid and has no down side.
That’s it for part two, make sure you subscribe to receive part three in your inbox next week.
Have a fulfilling and productive week ahead.
Justin
Loved the breakdown Justin!